
EWD-RL-SJ3 Intelligent elevator weighing device technical document user manual[V2.2]
User’s Guide
EWD-RL-SJ3
(Version 2.2)
XIAN EXCELLENT ELECTROMECHANICAL CO., LTD

EWD-RL-SJ3 Intelligent elevator weighing device technical document user manual[V2.2]
第 1 页 共 24 页
Caution: This system is applicable an elevator with fixed car platform. Before use, be sure to read the following sections carefully.
Note: Under any condition, our part is just responsible for the quality of product in the period of guarantee service.
Table of Contents
Product Overview
1、Product Appearance and Interior Structure
…………
Page2
2、Description of system controller terminals
…………
Page5
Installing Scheme of “Disc” XCL-Y/8625 type Sensor
Installing Scheme of Character “一” XCL-T/A type Sensor
Page3
Page4
Installation & Adjustment
3、System Structure and Installation Schematic Diagram
…………
Page6
4、Installing Method of Sensor and Controller
…………
Page6
5、System Adjustment and Explanation
…………
Page7
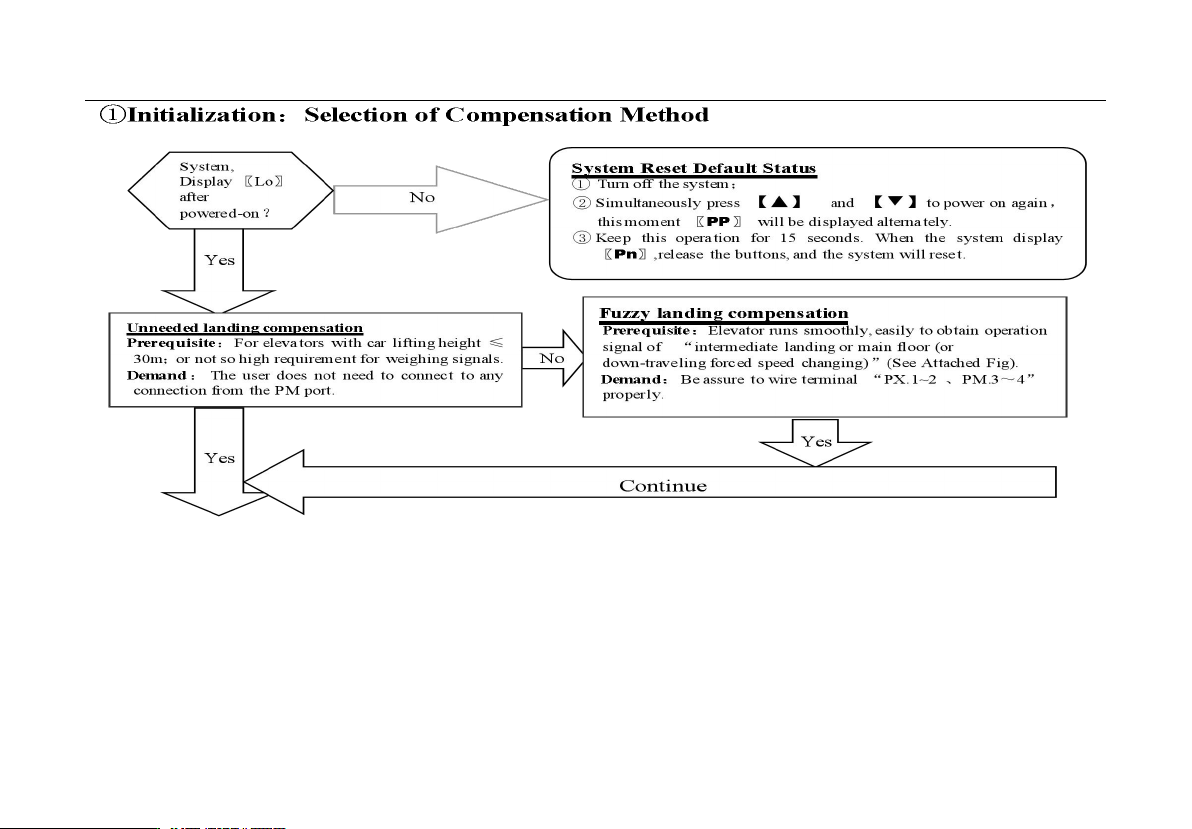
①.Initialization
…………
Page7
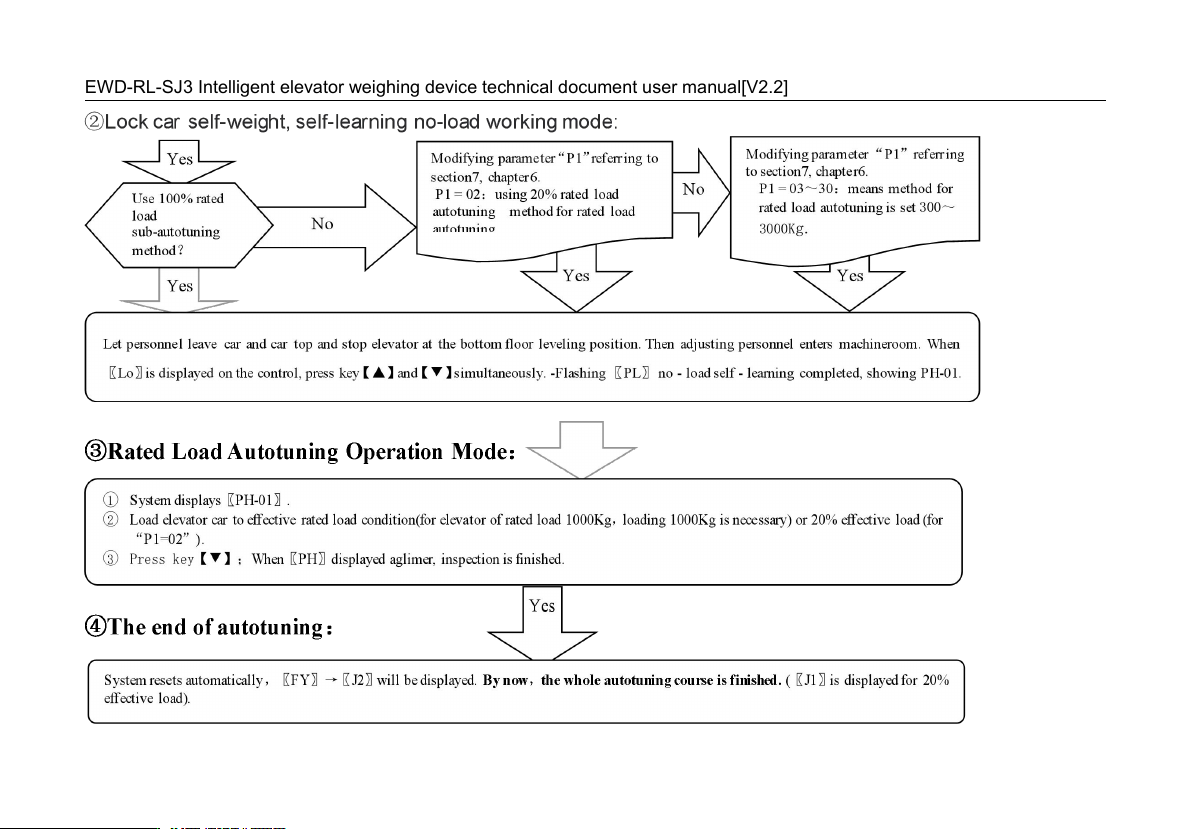
②.No Load Autotune Operation Mode
…………
Page8
③.Rated Load Autotune Operation Mode
…………
Page8
Implication and Adjustment Method of the
Operation Parameters
6、Adjustment of the System Parameters
…………
Page9
7、Explanation of the Meaning of Parameter P
…………
Page10
Indicating Code Explanation
8、Explanation of System Normal Operation Code
…………
Page13
9、Explanation of the Code of Other Operations and Fault
…………
Page13
How To Do?
10、Brief Analysis of Other Status
…………
Page14
11、How to repeat the Autotune operation for the system?
…………
Page15
12、How to do Rated Load Autotune by adopting 20% rated load?
…………
Page15
System Characteristics
13、Working Principle of “EWD-RL-SJ3”Elevator Weighing Device
…………
Page16
14、Main characteristics
…………
Page16
15、Technical Specifications
…………
Page17
Promise
…………
Page 19
Others
…………
Page 19
Attached Drawings
Attached Sheets
…………
P 21-30
EWD-RL-SJ3 Intelligent elevator weighing device technical document user manual[V2.2]
Page 2 total 26
Declaration: For the reason of technology advancement, our company reserves the right of improving product. As for the relevant technical parameters, Please refer to
the technical handbook delivered with the product.
PRODUCT OVERVIEW
1. Product Appearance and Interior Structure:
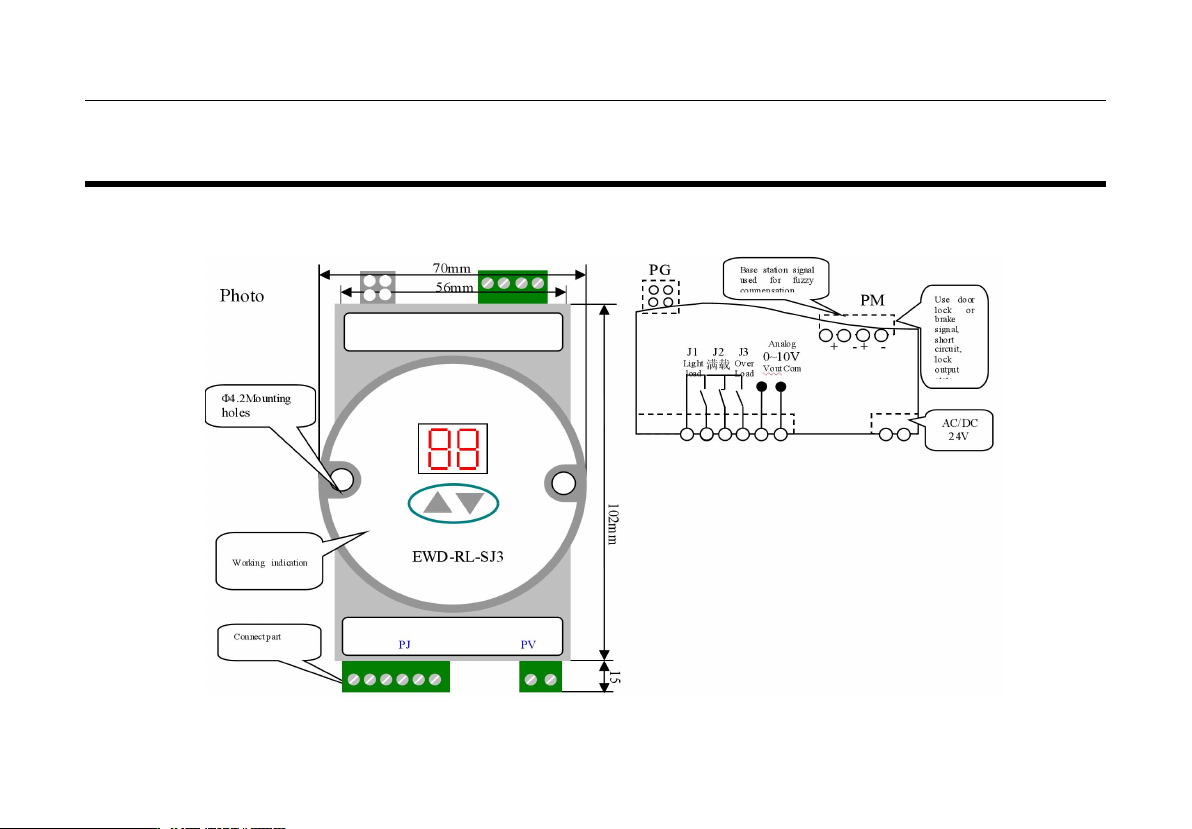
Schematic Diagram of Controller Appearance See Fig[1]
EWD-RL-SJ3 Intelligent elevator weighing device technical document user manual[V2.2]
Page 3 total 26
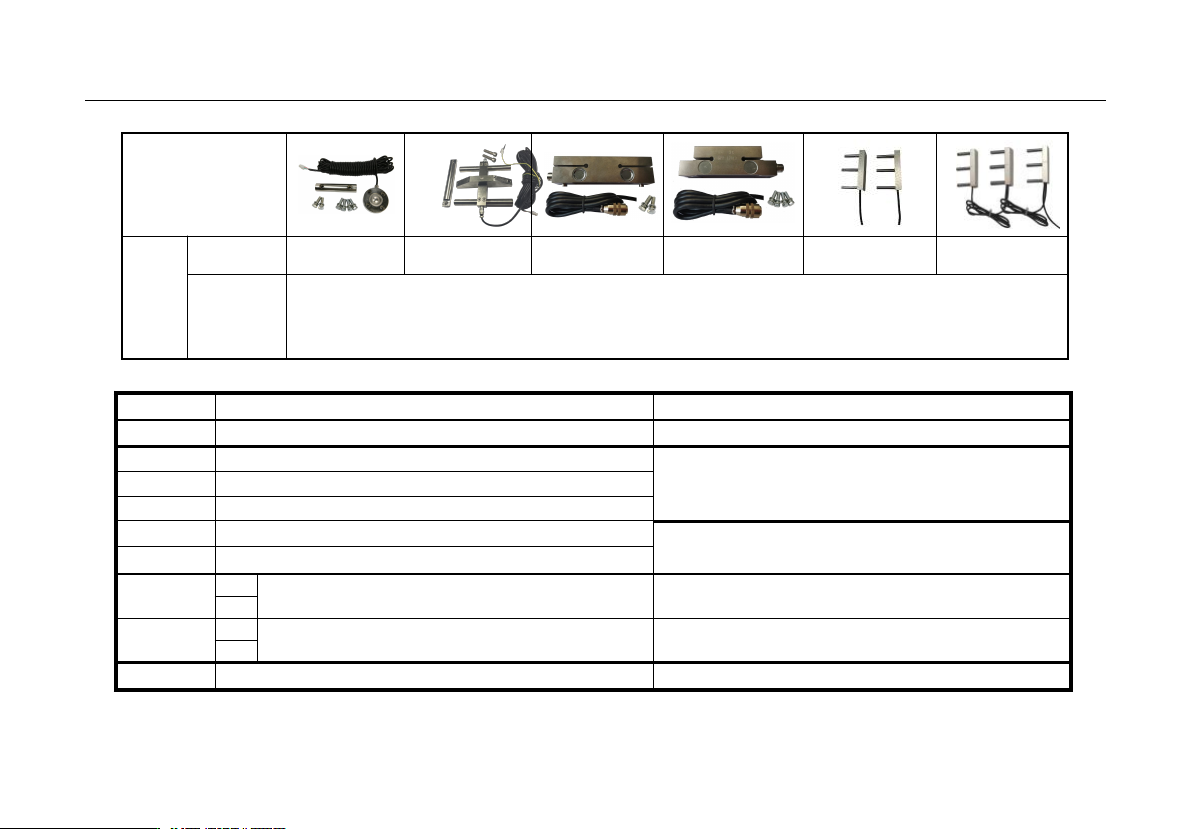
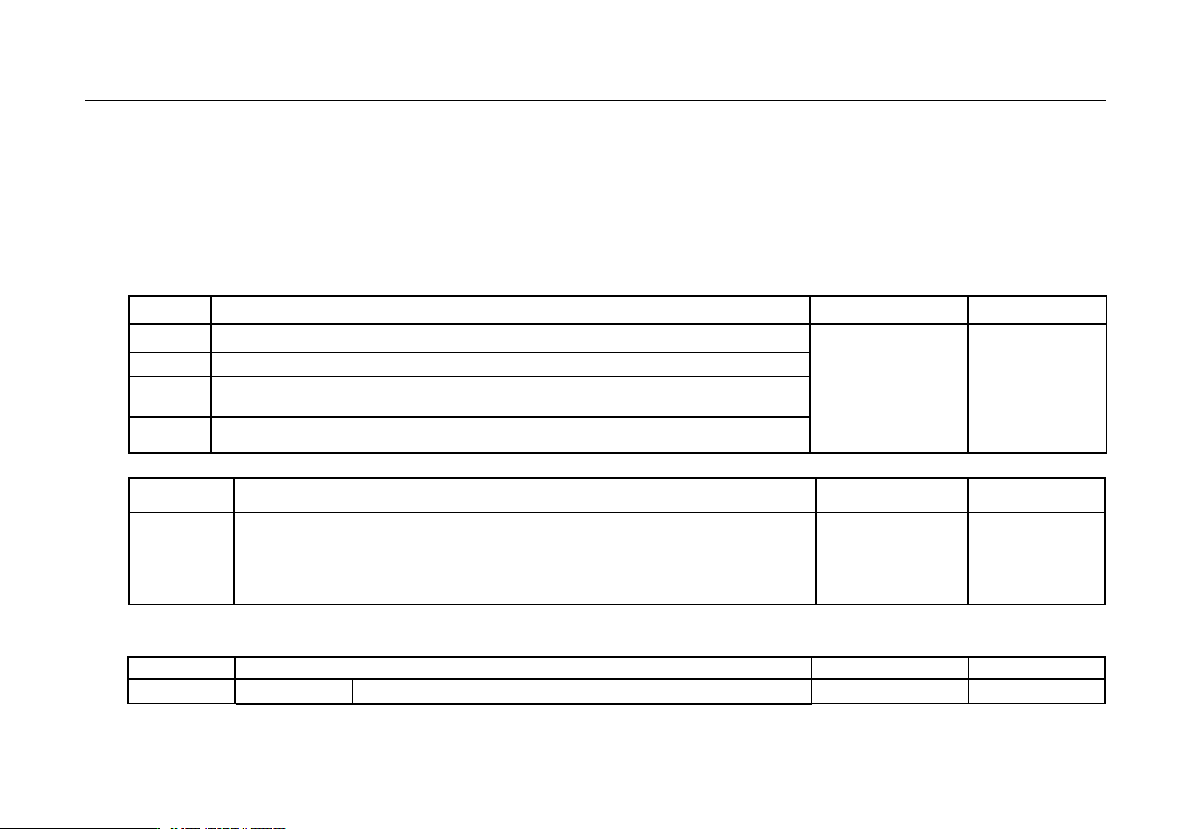
Sensor models and appearance:
Sensor profile
Nami
ng
type
XCL-Y/8625
XCL-ZL/W
XCL-T/A
XCL-T/B
XCL-ZL/P2
XCL-ZL/P3
Dimensio
ns and
mounting
methods
See attached page for details
2.Schematic Diagram of System Interior See
“
Fig[1]
”
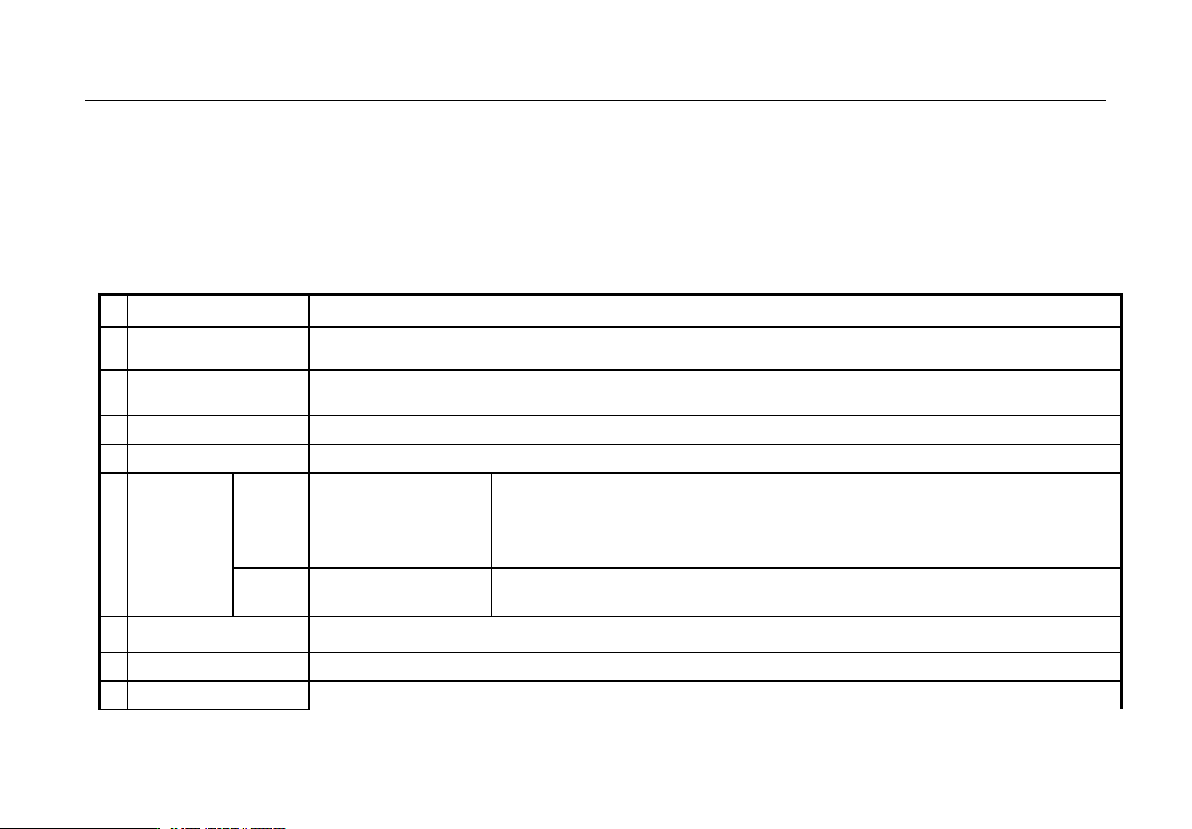
Function
Description
PG
Connect system load sensor
PJ.1 ~2
J1:
Light load output, Dyn open/Close
Max load capacity
DC/AC 48V/500mA
PJ.1 ~3
J2:
Full load output:Dyn open/close
PJ.1 ~4
J3:
Over load output:dyn open/close
PJ.5
Analog 0~10V output ports
Used for governor torque compensation
PJ.6
Analog com port
PM.1~2
+
For fuzzy intelligence compensation
Compensate for landing deviation
-
PM.3~4
+
Used to lock the output of the weighing device
See: attached figure
-
PV
Weighing device power supply port
AC/DC 24V/150mA
Absolutely don’t connect the output terminals (except “PV”) of this device to the
external power source directly and

EWD-RL-SJ3 Intelligent elevator weighing device technical document user manual[V2.2]
Page 4 total 26
the resulted permanent damage to the device is beyond our responsibility.
Installation and Adjustment
3. Schematic Diagram of System Structure and Installation
Schematic diagram of the whole machine: See Figure [1] for controller part; See sensor selection for the sensor
section.
4. Install Method of Sensor and Controller
1. The controller should be installed in the control cabinet of the machine room, and it is better not to be close to the
elevator electronic weighing device transformer, governor and other equipment. In all cases, sensors and controllers
shall be installed away from heat sources;
2. The connection between the sensor and the controller, it is best not to 110V, 220V and other power supply in the
same wiring slot;
3. Power on the weighing device after confirming that the check is correct, and the controller should be displayed in the
corresponding working mode.
5. System Adjustment Method and Description (Autotune Operation)
EWD-RL-SJ3 Intelligent elevator weighing device technical document user manual[V2.2]
Page 5 total 26
EWD-RL-SJ3 Intelligent elevator weighing device technical document user manual[V2.2]
Page 6 total 26

EWD-RL-SJ3 Intelligent elevator weighing device technical document user manual[V2.2]
Page 7 total 26
5.System adjustment under other conditions:
For following reasons, the parameters of this system need re-modifying in the way described above.
①
Elevator car decoration changing causes its dead weight change.
②Larger unbalance appears among traction ropes.
③Weighing sensor becomes flexible.
④
Overrunning at the top or at the bottom appears.
Operation Parameters Adjustment and the Implication
6. System Operation Parameters Adjustment
①Simultaneously press【▲】and【▼】on system control keypad to power on ,this moment 〖PP〗 will be displayed alternately, that
means entering operation parameters modifying status.
②Release【▲】and【▼】buttons,system will display〖P*〗and〖**〗alternately. 〖P*〗is an indication of system operation parameters;
〖**〗is the interior data value of〖P*〗.
③
When displaying
〖
P*
〗,
press
【▼】,
indication of system operation increases
;
press
【▲】,
indication decreases.
④
When displaying
〖
**
〗,
press
【▼】,
data value increases
;
press
【▲】,
data value decreases.
⑤Release buttons,system displays operation indication and configuring data alternately.
⑥To modify other configuring datum, repeat the operation of 3, 4, 5.
⑦At the moment when system displays 〖P*〗,Simultaneously press 【▲】and【▼】,system will save modified datum for future use.
This moment, system displays〖Pn〗 for 1 second. System operation parameters modification is completed. ( Note:* is any of the
hexadecimal value in the range of “0~9,A~F”.)
Example:Modify parameter P1 to 10;(System Setting effective load of 1000Kg)
Example:Modify parameter PJ to 03;(Pj3.1~2、Pj3.3~4 enabling for low voltage level compensation signal)
①Simultaneously press【▲】and【▼】on system control keypad to power on ,this moment 〖PP〗 will be displayed aglimer, that means
entering modifying status.
②Release【▲】and【▼】buttons,system will display〖P*〗and〖**〗aglimer
③When displaying〖P0〗,press【▼】to increasing it to〖P1〗;
④Release button【▼】,system alternately displays〖P1〗and〖**〗.
EWD-RL-SJ3 Intelligent elevator weighing device technical document user manual[V2.2]
Page 8 total 26
⑤When displaying〖**〗,press【▲】and【▼】to regulate its value as〖10〗.
⑥Release button,system alternately displays〖P1〗and〖10〗.
⑦At the moment when the weighing device displays 〖P1〗, press the [▲] and [▼] buttons at the same time, and the weighing device
memorizes and revises the data. At this time, the weighing device displays
〖
Pn] for 1 second. The working parameters of the weighing
device have been revised.
7. Implication of parameter P:Under normal circumstances, users do not need to modify the parameters after
"P0", and the weighing device will correct itself during the self-learning period.
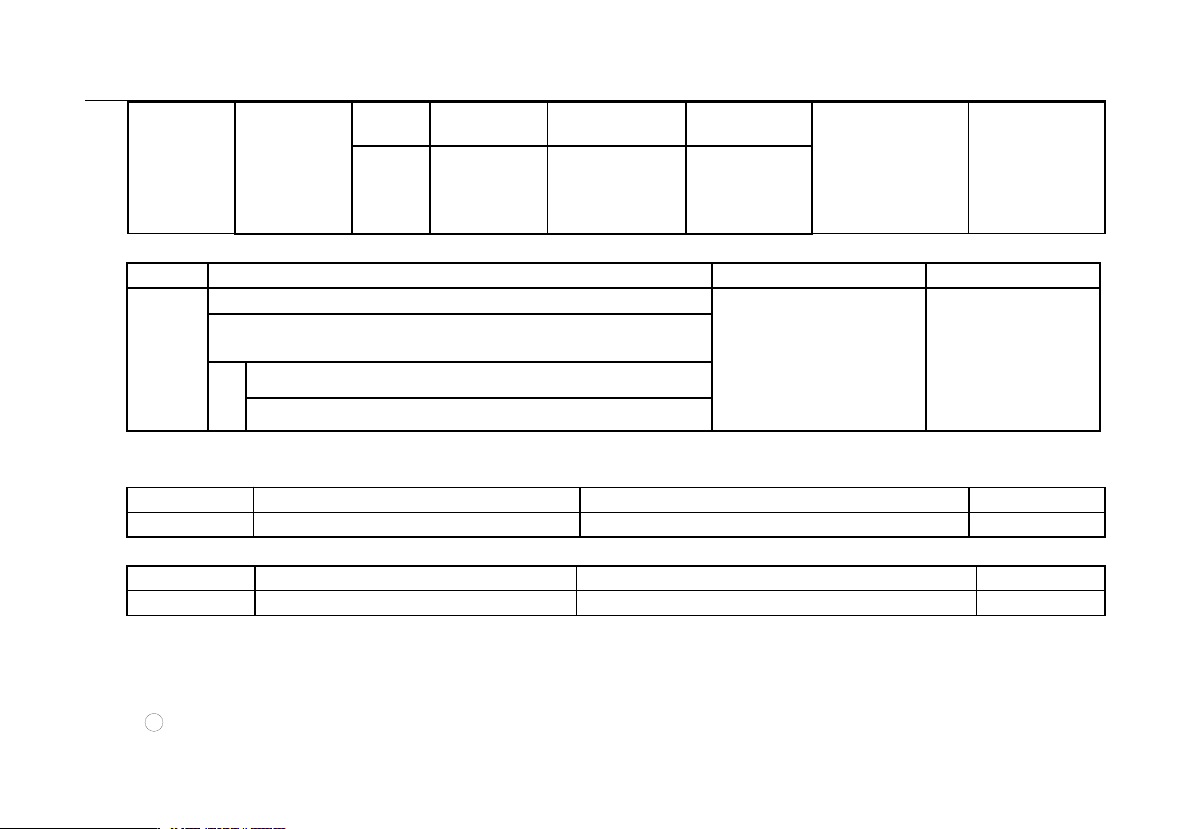
①
Directions of Parameter
P0[
System Operation Mode]:
Setting
Explanation
Default Setting
Normal Value
00
Normal Operation (Automatically modify by system after autotune.)
01
(Sensor positioning)
00
System Auto
Modifying
01
Sensor positioning, System autotuning.
09
Select "王" type intelligent sensor abnormal handling option
0A
The weighing device is set to the factory setting
②Directions of Parameter P1 [Rated Load Setting Mode]:
Setting
Explanation
Default Setting
User
’
s Setting
01/02 or
05
~
55
×100Kg
01---
“
100% Rated load,floor by floor
”
Autotuning Mode
;
02---
“
20% Rated load,floor by floor
”
Autotuning Mode
;
**
—
Select rated load setting mode(Not Recommended)Example
:“
10
”
means
rated load of 1000Kg. There is a certain error in this method.
01
(Rated Load
Autotuning)
③
Directions of Parameter P2、P3、P4、P5[Reserved]:
④
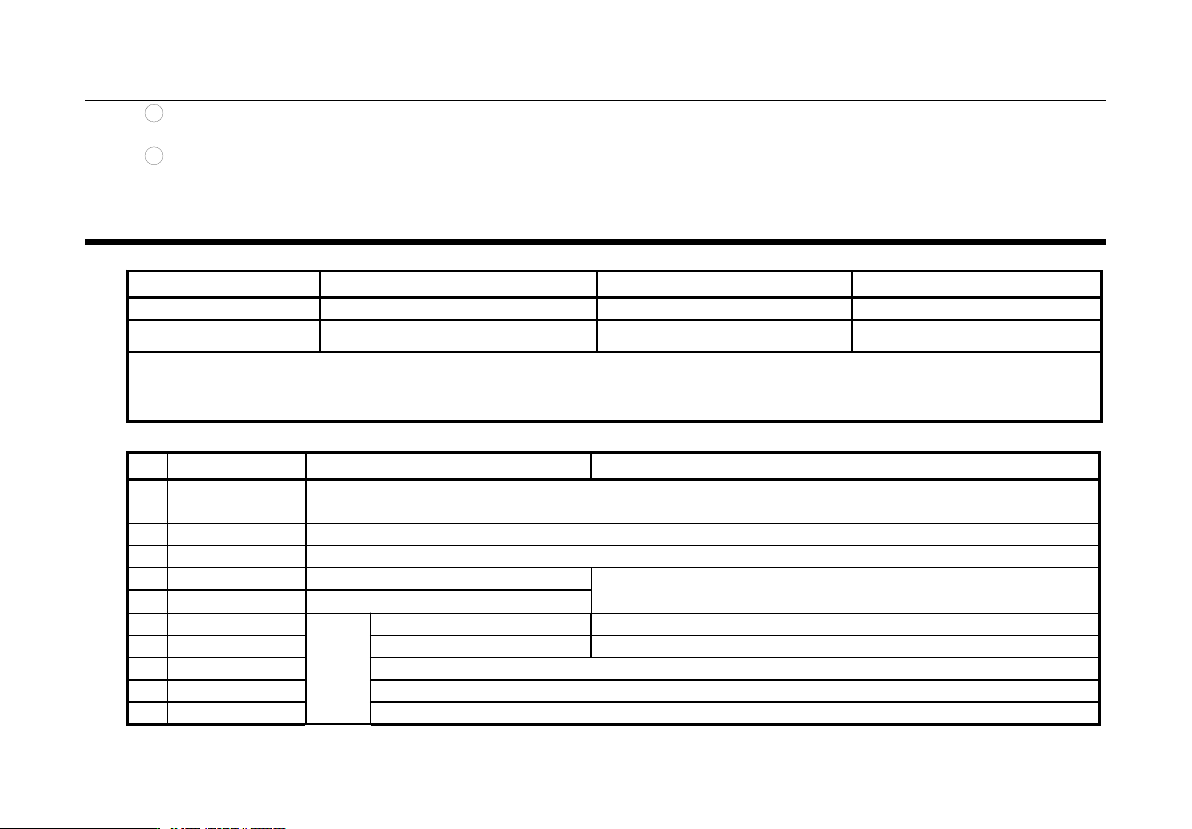
P6 Parameter description [Relay "J1, J2, J3" logic state setting]
Setting
Explanation
Default Setting
Default Setting
Higher Bits
Lower Bits
EWD-RL-SJ3 Intelligent elevator weighing device technical document user manual[V2.2]
Page 9 total 26
00~17
0---
Select 0~10V
1---
Select 10~0V
Contact
condition
J3
J2
J1
03
(J1,J2 Relay
output,J3 Dynamic
open output
,
analog
quatity 0~10V is
valid)
3
Dynamic break
Dynamic closing
Dynamic closing
⑤Directions of Parameter P7
Setting
Explanation
Default Setting
User’s Setting
00~99
A0~A9
b0~b9
C0~C5
When Load≥ Rated load×P9%,“J1”signal is output.
10
Set “J1”to actuate at 10%
of rated load
00~99:Actuating for 0~99% rated load;
A0~A9:Actuating for 100~109% rated load;
Example
P7=80
:
For effective load of 1T
,
system actuates at 800Kg.
P7=A5
:
For effective load of 1T
,
system actuates at 1050Kg.
⑥Directions of Parameter P8 [Operation Range Setting of Relay“J2”]:
Setting
Explanation
Default Setting
User
’
s Setting
The same as P7
The same as P7
80“J2”Setting: actuating for 80% Rated Load
⑦Directions of Parameter P9 [Operation Range Setting of Relay “J3”]:
Setting
Explanation
Default Setting
User’s Setting
The same as P7
The same as P7
A5 Setting“J3”: actuating for “J3”105% Rated Load
⑧PA Parameter description [Reserved]:
⑨
PB Parameter description [Reserved]:
⑩
PC Parameter description [Reserved]:
Attention :
1 If the setting value is not specified, the weighing device will not work normally.
EWD-RL-SJ3 Intelligent elevator weighing device technical document user manual[V2.2]
Page 10 total 26
2
The no-load automatic zero parameter should be used carefully because of the diversity of the no-load point drift of the elevator;
You are advised to disable or allow this function based on the elevator status.
3
Even if the no-load automatic zero function is opened, the weighing device should be re-carried out during the regular
maintenance of the elevator
Self-learning work.
Explanation of Displaying Code:
8.System Normal Operation Code:
〖J0〗
〖J3〗
〖J2〗
〖J1〗
No Relay Output
Output of Relay J3
Output of Relay J2
Output of Relay J1
The default load is 105% broken
The default load is 80% action
The default load is 10% action
1.Press
【】
,
“HJ※※※※ ”
displaying indicates present car effective load. Such as displaying
“
HJ0520
”
means load of 0520Kg.
2.During fuzzy compensation, displaying
“
0.0.
”
means compensation is
“
Enable
”,“
0.1.
”
indicates elevator entering modifying
zone.
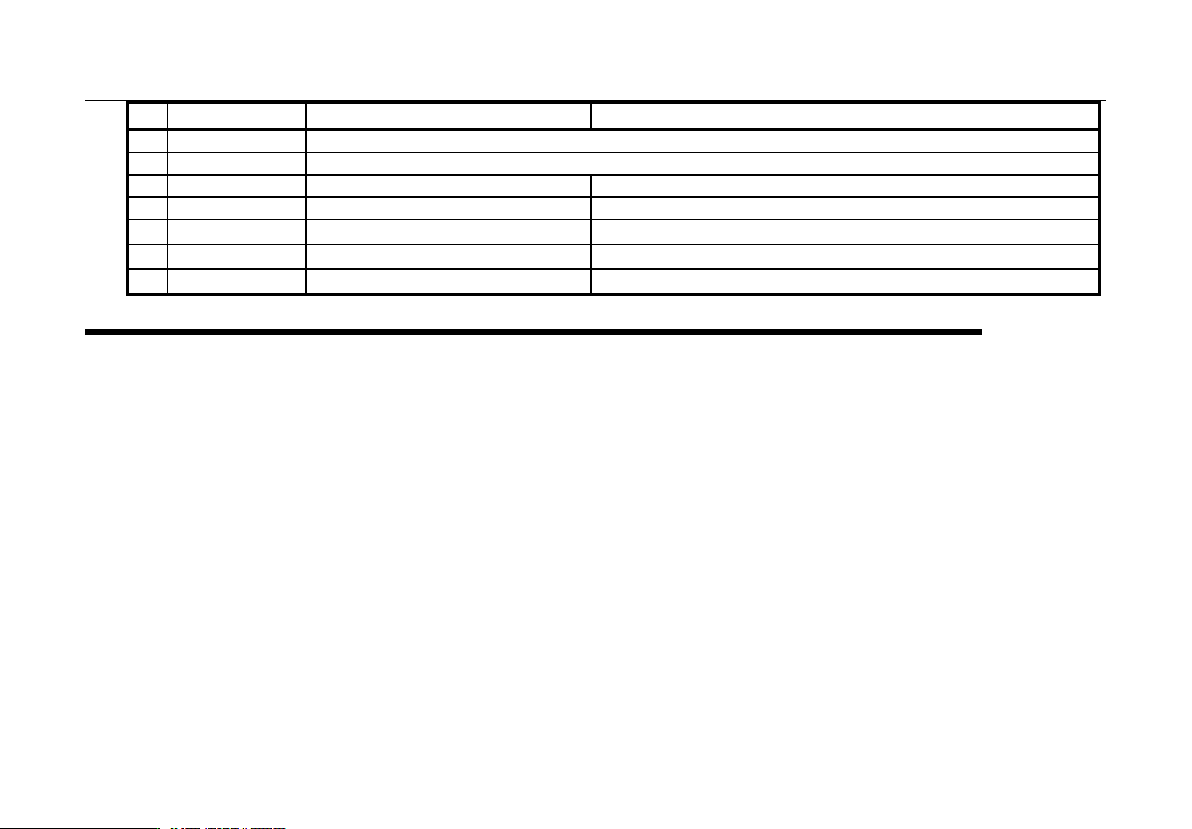
9.Code for Other Operation and Failures
Display Code
Indication
Solution
1
FY
Starting indicator of weighing device, flashing display indicates that P0 setting of weighing device parameter
is incorrect
2
Pc
Sensor Resetting
3
PP
Get into the status of operation parameters modification
4
PL
Autotuning No load parameters
(Still Displaying indicates preparation status
,
flashing displaying
indicates the end of inspection)
5
PH
Autotuning Rated load parameters
6
LL
Installat
ion and
position
ing
Too big Positioning
Sensor having no load
7
LH
Too small Positioning
Sensor overload
8
Lo
Accurately Position
9
LP
Interior Auto Correction
10
LY
Forcibly skip sensor interior auto correction
EWD-RL-SJ3 Intelligent elevator weighing device technical document user manual[V2.2]
Page 11 total 26
Display Code
Indication
Solution
11
P*
System Configuration Indication
12
Pn
Saved
13
EA
Saving Failure
Modifying operation parameters
14
EJ
Without this system setting
Check System Settings
15
EH
Applied Overflowing Pressure
Sensor Standing Pressure beyond its bearing range
16
EL
Applied Insufficient Pressure
No applied pressure to Sensor
17
EF
Memorizing abnormally
Repeat this operation.
How to do
?
10.Brief Analysis of Other Conditions:
⑴ Bad system Operation Stability with the main indication of large output fluctuation in the condition of fixed
load and elevator motionless?
Check if PV power supply source fulfils system requirements?
⑵ After long-term of operation, system no load zeroing point appears larger deviation?
May be caused by the reason described in section 4 , chapter 5. Set system Autotuning mode to calibrate again,or
startup parameter“PE≠0” to realize the function of system no load auto zeroing.
Poor Landing Compensation consistency?
Modify lower bits of Parameter“P4”.
⑷ Traveling Up and down with the same load and stopping at the same floor, but the weighing result is different?
Lift rope pull is not symmetrical,adjust please.
② Elevator guide shoes are too tightened,running friction is large. It is recommended to adjust or modify relevant
mechanical part to make it move flexible,then operate the system to autotune again.
⑸ System output signal doesn’t change linearly along with load?

EWD-RL-SJ3 Intelligent elevator weighing device technical document user manual[V2.2]
Page 12 total 26
Maybe system sensor damaged.
⑹ How to descry present effective load of elevator car?
In the period of system normal operation, press button【 】.This moment, system displays〖HJ〗→〖**〗→〖**〗
.For example :displaying 〖HJ〗→〖09〗→〖50〗 indicates a car with rated load of 1000 Kg presently bearing
an effective load of 950Kg.
If elevator effective load is not 1000 Kg,it may be decided after system autotuning operation is finished by
modifying parameter“P1”.
Because of various impacts from outer environment,displayed data may fluctuate in a small scope.
⑺ When elevator is motionless, weighing signal is normal. But in the course of door opening, it is abnormal?
Elevator door operation system causes relative car weight offset. It may be controlled by adopting door
opening/closing relay output signals+ door lock signal jointly participating system PC.3~4 locking control.
⑻During system operation, analog output is abnormal, repeatedly resetting or abnormal coordination with speed
regulator?
May be caused by crossing and interfering system power source. Select another set of power source to supply
system,or equip another AC/DC 24V/300mA exterior power source to supply power.
11. How to do Re-Autotune operation for system?
Method 1:Simultaneously press【▲】and【▼】 on system control panel to power on. This moment, system
aglimmer displays〖PP〗.Keep 15 seconds,system will display〖Pn〗.On that occasion,all operation
parameters reset to default settings.
Method 2:Modifying parameter P0=0A will reset system immediately to default status. But for users with
specified code, it is necessary to modify parameter P0 as appointed code. Detailed operation is described
in chapter 6.
12. How to adopt 20% rated load for rated load autotune?

EWD-RL-SJ3 Intelligent elevator weighing device technical document user manual[V2.2]
Page 13 total 26
Modify parameter "P1=02" after the weighing device displays 〖Lo〗. The no-load self-learning of the weighing
device is completed in accordance with the "Five" chapter. During the display 〖PH〗, the weight equivalent to 20% of
the rated load of the elevator should be added to the car for the load self-learning operation. After the operation is
completed, the display 〖J1〗 will be displayed.
System Features
13.Working Principle of“EWD-RL-SJ3”Elevator Weighing Device
With the constantly development of elevator technology, the impact of elevator weighing devices on elevator
performance can not be neglected. The requirement of elevator for weighing devices with high accuracy, high
reliability and multi functions becomes extremely urgent. Nowadays, the progress of sensor technology and
microcomputer is ceaseless. Inspecting electric signals producing by elevator car load changing with high accurate
“Disc” type loading sensor, meanwhile, performing scientific calculation and procession with single-chip
microprocessor, the aim of weighing elevator car effective load is fulfilled.
14. Main Characteristic:
①Selecting directly-compressing“Disc”type load sensor,it is unnecessary to change the pull rod of traction rope
shackle.
②Weighing range is wide (effective load of 300Kg~5000 Kg),high-accuracy position,intelligent temperature
compensation.
③ Inner core consists of highly accurate load sensor and high performance single-chip micro-computer. All
operation parameters can be set on field.
④ System may do scientific calculation according to mathematical equations with the function of no-load auto
zeroing,automatically modifying measuring error.
⑤The capability of fuzzy compensation improves the requirement of elevator for high accuracy weighing signals.
EWD-RL-SJ3 Intelligent elevator weighing device technical document user manual[V2.2]
Page 14 total 26
⑥Being provided with load setting or 20% or 100 %rated load autotuning sub-function under the condition of auto
removing dead weight. It is easy to fulfill user’s requirements.
⑦Autotuning for on-site adjustment makes it easy to be adjusted.
⑧Having the function of operation parameters auto modification and fuzzy landing compensation function.
⑨The whole shoot starts from users’ point of view,easy installation and adjustment,decreasing users’ additional
cost in use,high ratio of performance to price.
15. Technical Specifications::
⒈
Application Range
Being applicable to all traction elevators with fixed car platform with the load of 500㎏~3000/5000㎏
⒉
Landing
Compensation Method
Auto adapting intelligent fuzzy compensation
⒊
Sensitivity
Elevator Rated Capacity/200 (Example
:
The rated capacity is 1000
㎏
, and the sensitivity is 5
㎏
) [This data
may be affected by elevator mechanical performance.]
⒋
System Error
≤0.5% (5~40℃)
⒌
Non-linearity
≤0.5%
⒍
Output
Mode:
Relay
Programmable
common
signals:
①2-channel programmable output modes are: No load, light load, semi full load,
heavy load, rated load, overload (customer may set the changing range freely).
②Each channel can be programmed as dynamic Close or Open contact.
③Contact Capacity: DC/AC 48V/100mA。
Analog Output
:
It performs linear change (0
~
10V) when Elevator load is changing from
“
no
load
~
rated load
”
.
⒎
Operation Ambient
Temperature
Temperature:-20
~
55
℃
⒏
Relative Humidity
20%
~
90
%
RH
⒐
Reaction Time
≤0.3Second
EWD-RL-SJ3 Intelligent elevator weighing device technical document user manual[V2.2]
Page 15 total 26
⒑
Power Supply:
AC/DC24(±10%)V/200mA
⒒
Install Position
Sensor Section
:
At the place of traction rope shackle
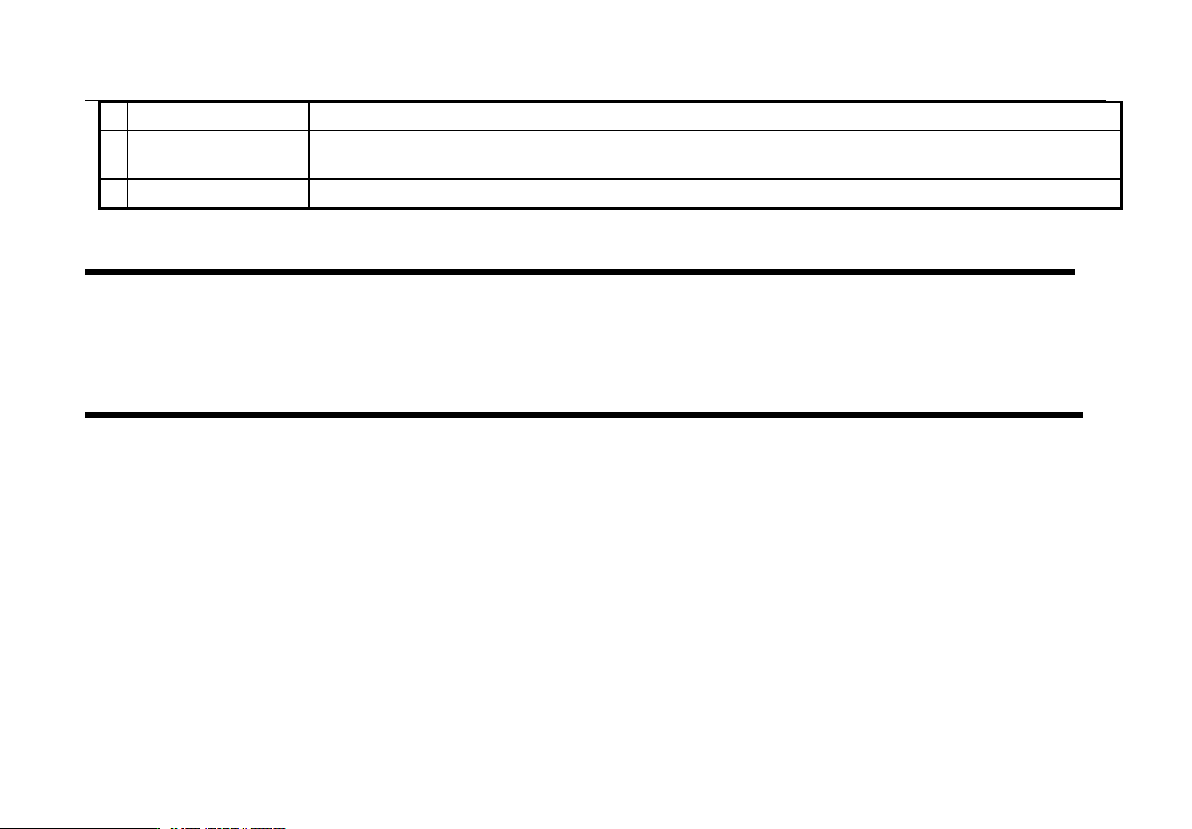
Controller Section:Control Cabinet in machineroom. See the attached figure for installing dimensions.
⒓
Overall Size
Sensor Section
:
See the figure
;
Controller Section
:
See the figure
:The intension exceeding the limit parameters listed above may result in the abnormality or permanent damage to the system.
Promise
⑴If this system appears any quality problem of product itself in 1 year after delivery, it will be replaced freely
(
damage of the product seal will not be dealt with
)
。
⑵For any requirement of special functions, make it out by mail.
⑶Any system abnormality in adjustment or operation, please contact our company directly.
Others:
1.Packing List:
Controller
1set
M4*40 mm Fastening Screw sets
2 sets
Load Sensor
1set
Load Sensor attachment
6 sets
User
’
s Guide
1copy
Technical Support:0086-18092639750 0086-18092639752
⒉Address book::
Xi’AN EXCELLENT ELECTROMECHANICAL CO.,LTD
:
(029)88416613,
85565714,85568478
:
7D,Block A, Olympic Building, 14th
Chang An North Road, Xi'an, Shaanxi,
China
:
(029)85565714-886
:
710068
EWD-RL-SJ3 Intelligent elevator weighing device technical document user manual[V2.2]
Page 16 total 26
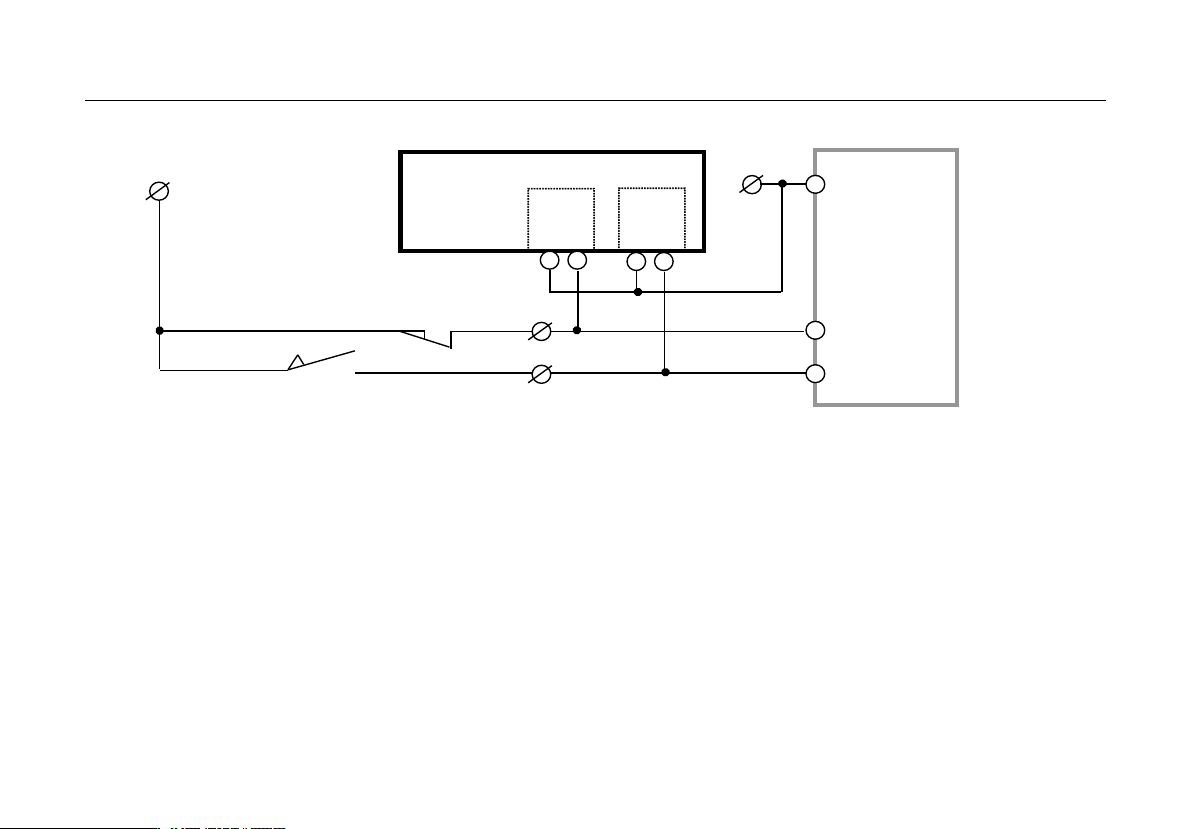
Att. Fig:Wirin g Method of Terminal PM an d PX Under Auto accommod ating fuzzy L anding compensation
Rec ommended Application Range of this mode:All elevators with better mechanical installation characteristic.
Notes:⒈ Directly parallel connect PX1~2 and PM1~2 to corresponding electric circuit. If user selects “mid landing” position
signal, more accurate compensation effect may be received.
⒉ If the common polarity of elevator signals is +COM (power source), reversely connecting the terminals of PX and
PM, i.e., exchange PM.1 and PM.2.The rest may be deduced by analogy
⒊ Voltage of terminal COM should be in the range of“DC12~32V”.
-COM
EWD-RL-SJ3 Partial Terminals
Mid landing o r Main Floor Sign al (or down forced speed chang e)switch
Car Door or Doo r Interlock Switch
+COM
Microprocessor or PLC FLOOR
SELECTOR
PM
1 2
+ - + -
PX
1 2
EWD-RL-SJ3 Intelligent elevator weighing device technical document user manual[V2.2]
Page 17 total 26
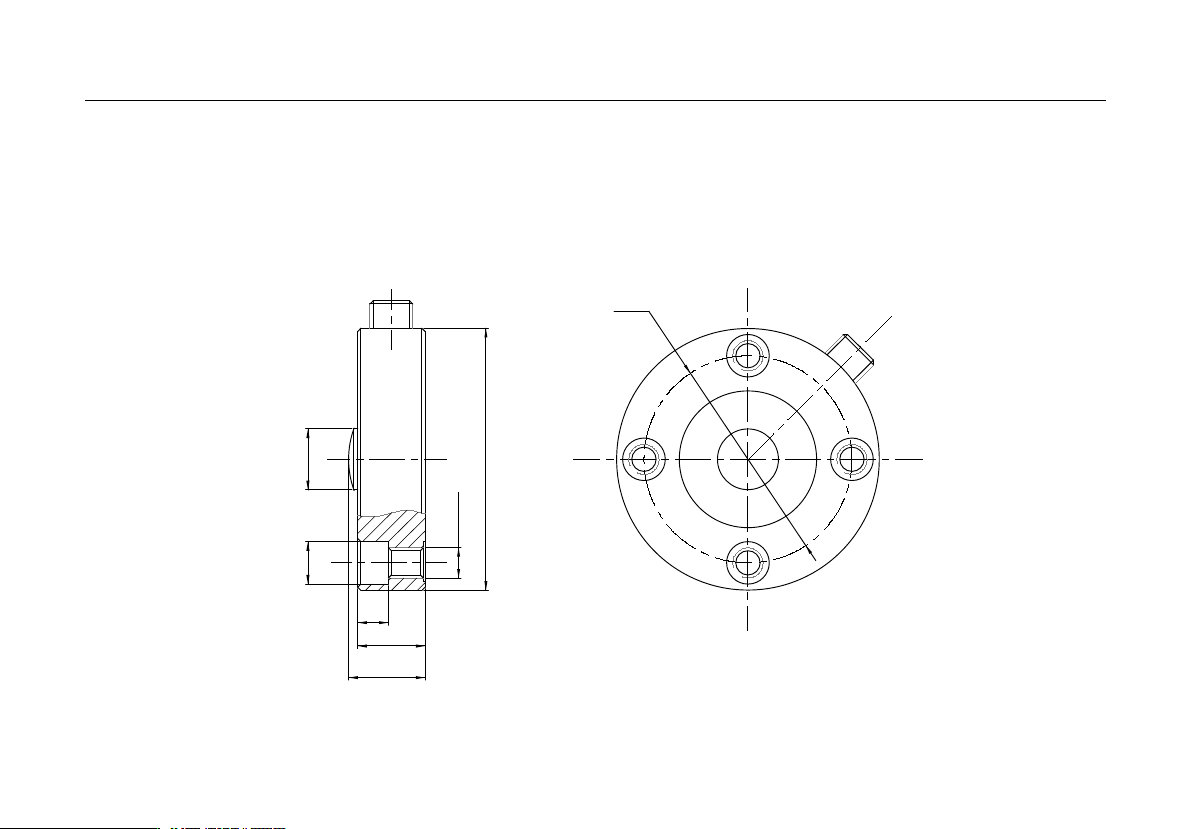
Φ68
25
10
22
4-Φ14
4-M10
Φ86
Φ20
Attched document:
Load sensor dimensions and installation
1.XCL-Y/8625 loading Sensor size and installation method:
1.1 size (range:
12KN、22KN、30KN、40KN、50KN、70KN
)
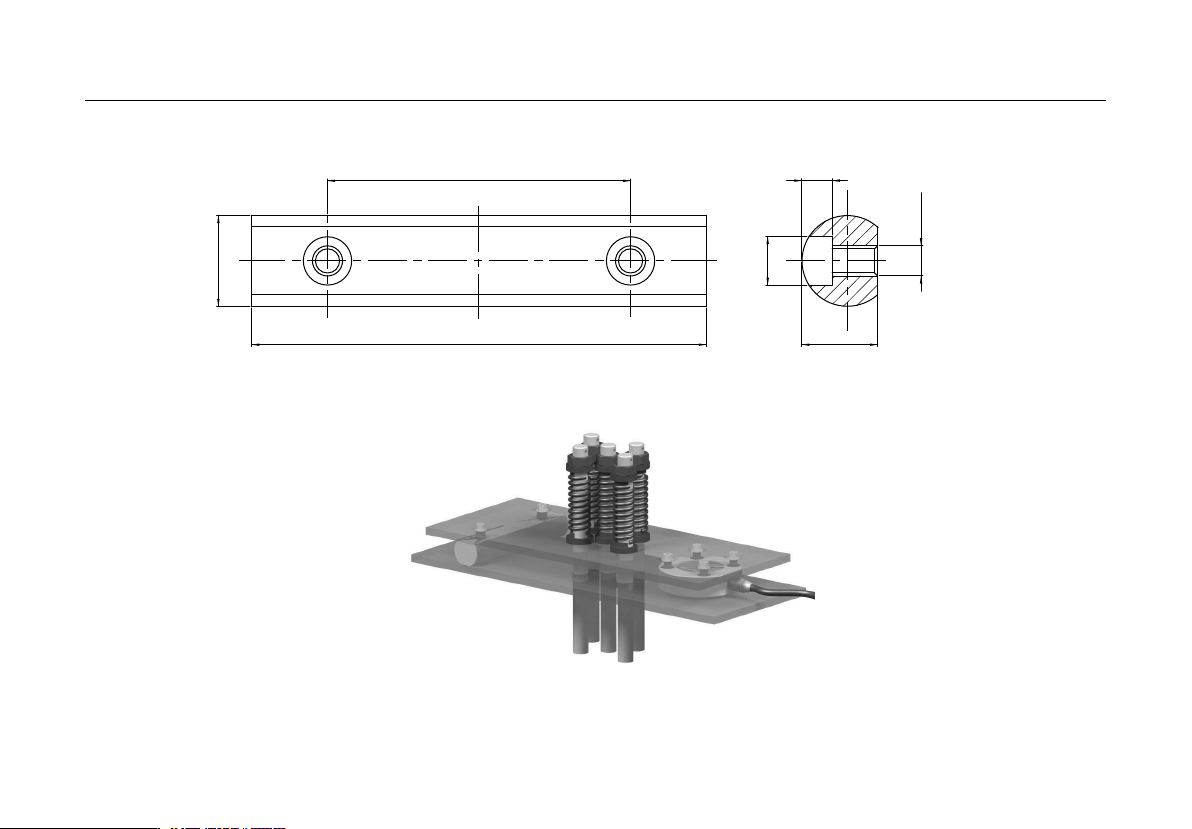
EWD-RL-SJ3 Intelligent elevator weighing device technical document user manual[V2.2]
Page 18 total 26
100
150
Φ
30
25
10
2-
Φ
16
2-M10
Bar size chart
1.2 Install Method
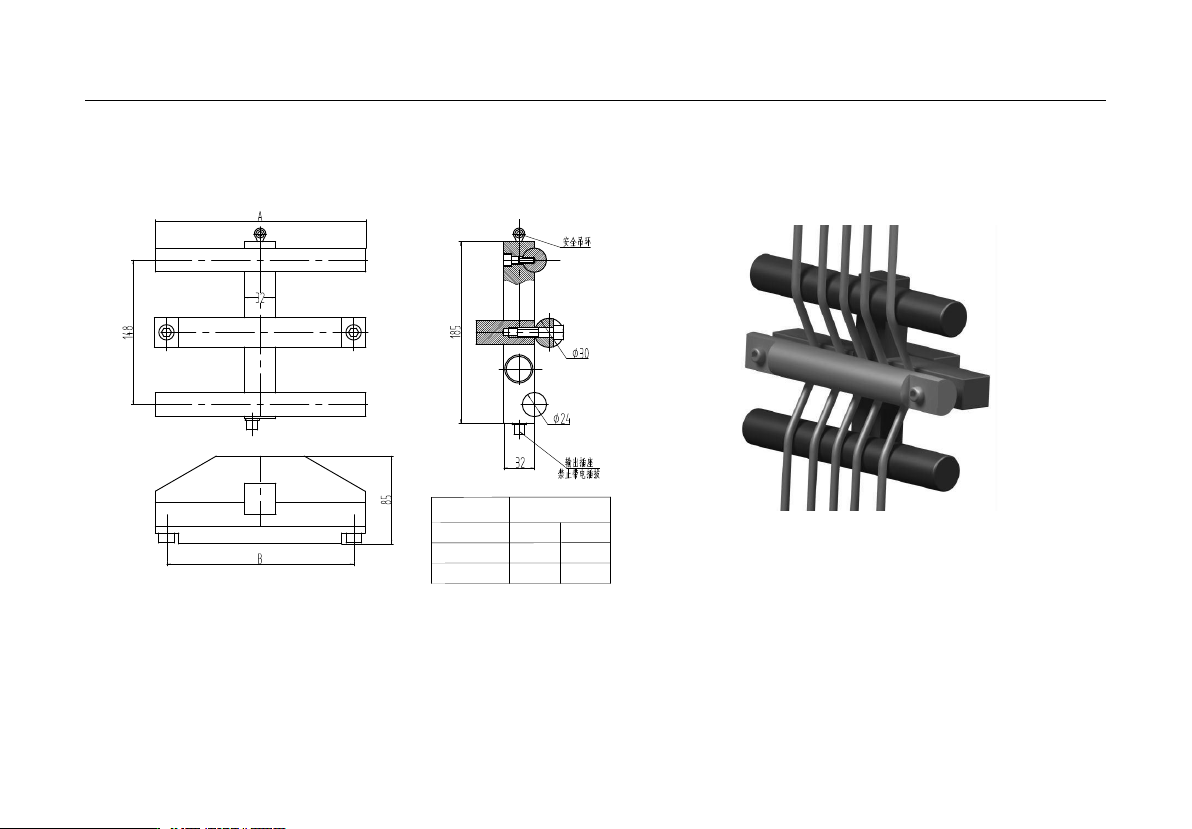
EWD-RL-SJ3 Intelligent elevator weighing device technical document user manual[V2.2]
Page 19 total 26
传感器量程 传感器相关尺寸
KN A B
20
50
216 192
260 238
2. XCL-ZL/W Load Sensor size and installation method:
2.1 Load Sensor demensions: 2.2 Install Method
Note: During installation, be sure to use Ø6 wire rope to connect the safety ring and
secure it on the support of the tractor, in case the sensor falls off during installation and
debugging, to ensure personal safety!
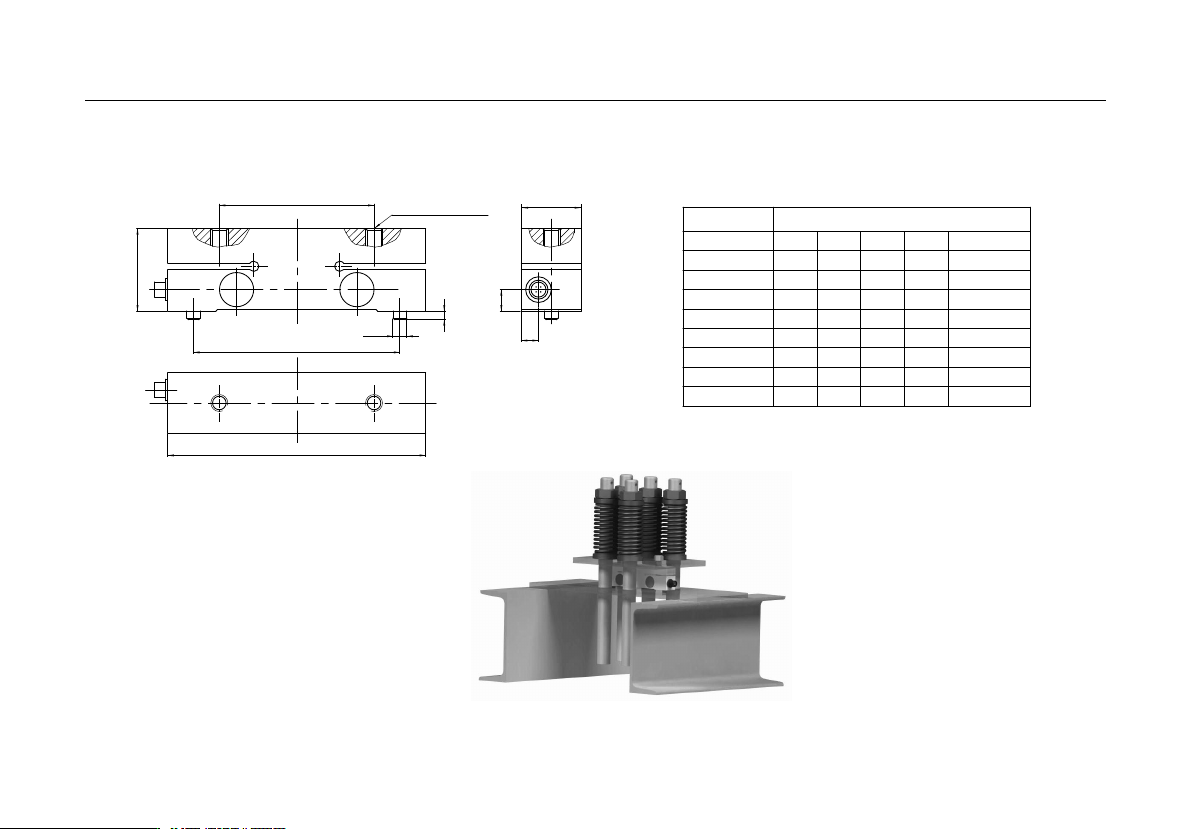
EWD-RL-SJ3 Intelligent elevator weighing device technical document user manual[V2.2]
Page 20 total 26
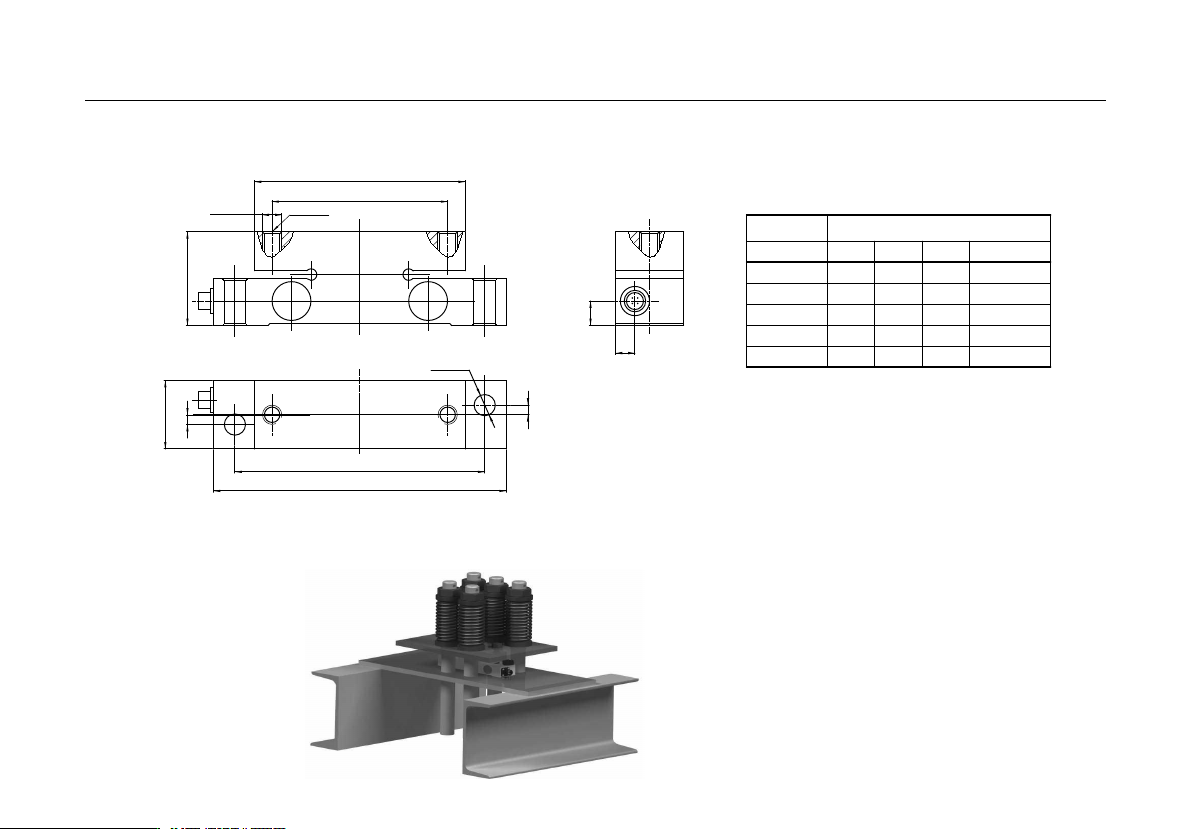
3.XCL-T/A Load Sensor size and installation method
3.1 Load Sensor demensions:
3.2 Install Method:
150
C
90
H
B
120
5
2-
Φ
8
2-M10(螺纹孔深度)
A
传感器量程 传感器相关尺寸
KN A B C
螺纹孔深度
H
10
15
20
30
50
70
100
150
25 8 12.5
通孔
41
25 8 12.5
通孔
41
25
8
12.5 通孔41
35 10 12.5
通孔
48
35 10 12.5
通孔
48
35 8 17 1860
35 8 1760
35 8 2170
18
18
EWD-RL-SJ3 Intelligent elevator weighing device technical document user manual[V2.2]
Page 21 total 26
4.XCL-T/B Load Sensor size and installation method
4.1 Load Sensor demensions:
4.2 Install Method:
150
128
108
90
H
35
5
2-
Φ
11
A
B
2-M10
5
螺纹孔深度
传感器量程 传感器相关尺寸
KN A B
螺纹孔深度
H
30
50
70
100
150
10 12.5
通孔
48
10 12.5 通孔48
8
17
1860
8 17 1860
8 17 1870
EWD-RL-SJ3 Intelligent elevator weighing device technical document user manual[V2.2]
Page 22 total 26
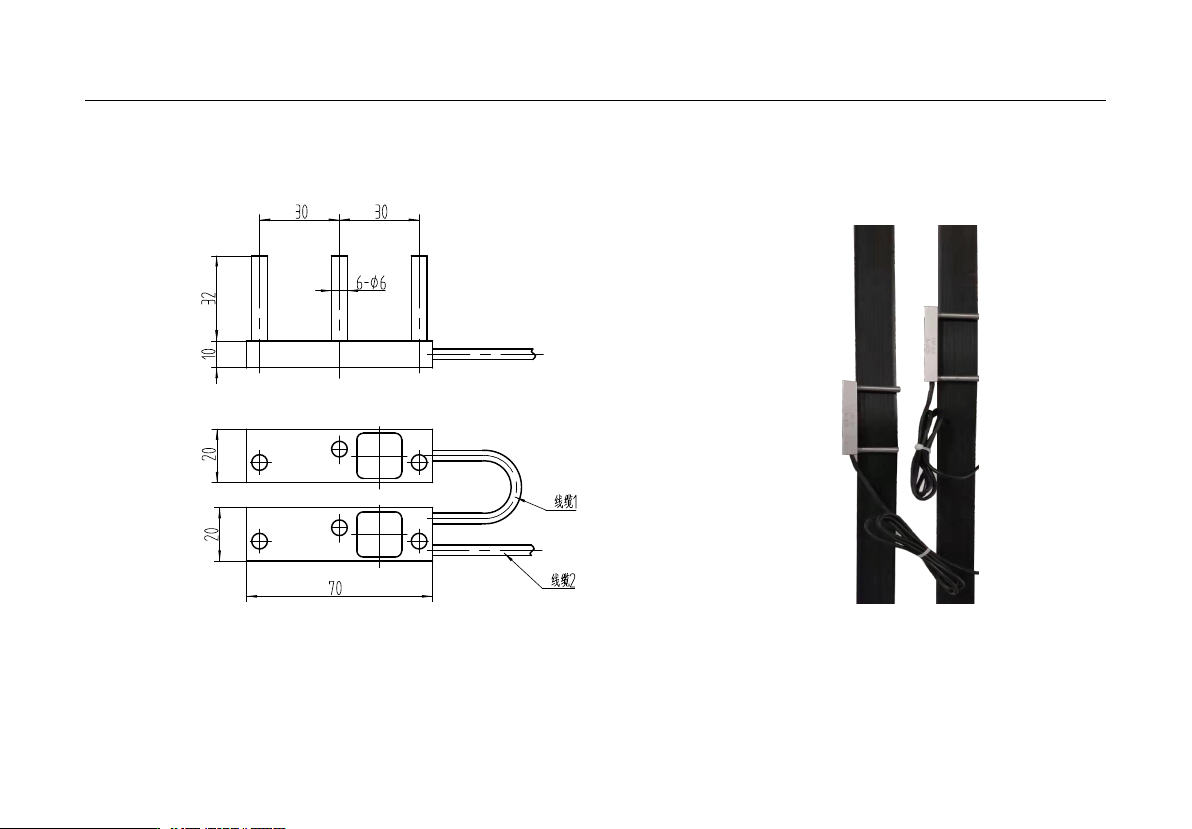
5. XCL-ZL/P2 Load Sensor size and installation method:
5.1 Load Sensor demensions
(range:5KN、8KN)
: 5.2 Install Method
EWD-RL-SJ3 Intelligent elevator weighing device technical document user manual[V2.2]
Page 23 total 26
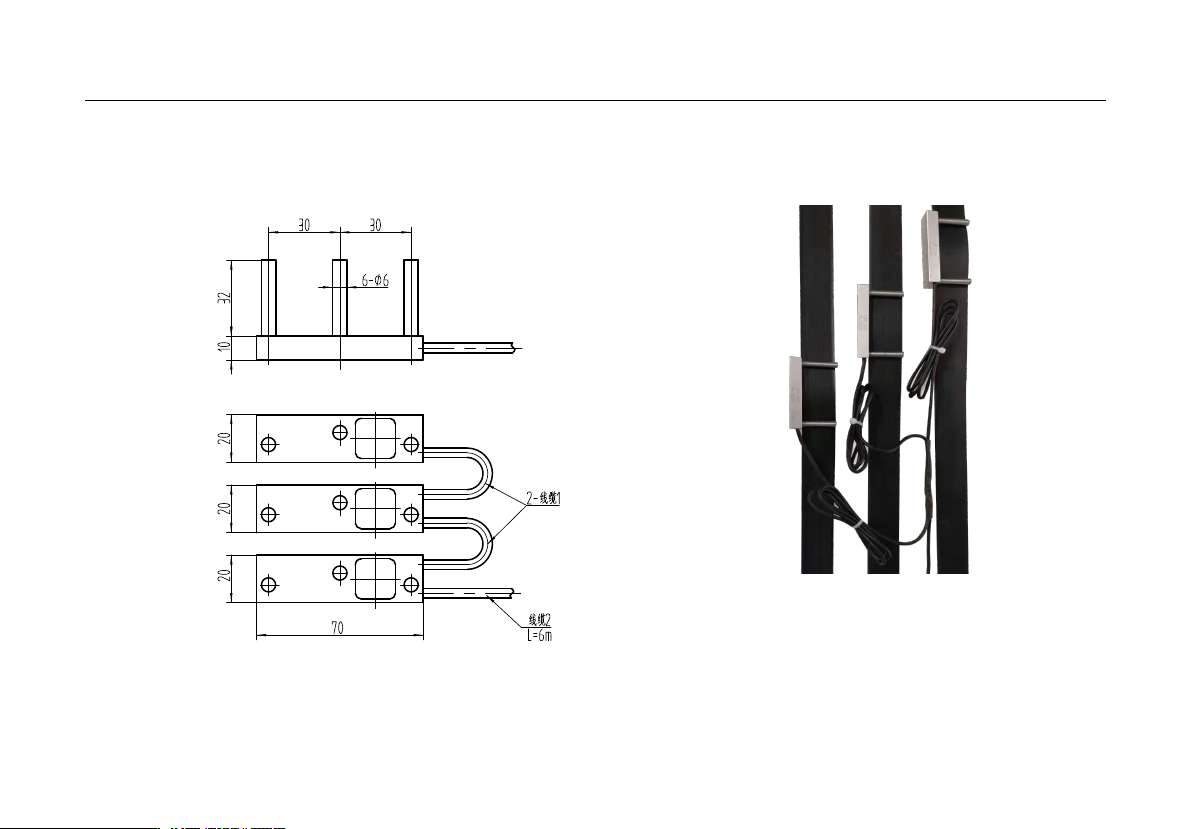
6. XCL-ZL/P3 Load Sensor size and installation method:
6.1 Load Sensor demensions(range:5KN、8KN): 6.2 Install Method
